Contract bridge didn’t just appear. It exploded onto the scene in the 1930s as an international obsession. Today, it holds a grudging respect as the ultimate card game. Even players who have dealt cards for forty years still find blind spots in their knowledge. You’re not alone if you feel lost. The mechanics are dense. They demand attention.
This breakdown covers the core pillars: bidding, playing, and scorekeeping. Master these fundamentals first. Once the rules click, you can explore the chaotic variations. There’s Auction Bridge. Honeymoon Bridge. Reverse Bridge. Even Three-Handed Bridge exists for those who hate waiting. But start with the foundation. Start with the rules of bidding in Contract Bridge.
The Setup and Objective
Four players sit at a rectangular table. Two teams. Partners sit directly across from each other. Tradition dictates the compass points. North and South form one partnership. East and West form the other. It’s a geometry of conflict.
The goal is straightforward but deceptively deep. You score points by taking tricks during the play phase. The bidding phase determines which partnership gets to declare the contract. The ultimate prize is winning a rubber. That means securing two games before the opposition does. It’s a marathon disguised as a card game.
The Deck and The Deal
You need a standard 52-card deck. Nothing exotic. No jokers. Each deal requires the full pack. Experienced players keep a second pack nearby. Why? Efficiency. While one hand is being scored, the next one is already shuffled and ready. Speed matters. Momentum matters.
The dealer initiates the process. All cards are dealt out. Usually 13 to each player. No leftovers. Once the cards hit the table, the auction begins. This is the heartbeat of the game. Without a clear contract, there is no play. The auction sets the stage. It defines the risk and the reward.
Decoding the Auction
Most card games with bidding are simple. You raise. You pass. You fold. Bridge rejects this simplicity. The auction is where the game truly lives. It is creative. It is complex. It is a language.
Players must communicate their hand strength and distribution without giving away too much information to the opponents. It’s a psychological duel wrapped in a mathematical problem. You are trying to find a safe contract while sabotaging the other side’s ability to bid higher.
The bidding is not just about scoring points. It is about information warfare.
Understanding the bidding in Contract Bridge requires patience. You don’t just guess. You analyze. You listen to your partner’s calls. You watch for patterns. The first few hands will feel like decoding alien text. That’s normal. The structure is rigid, but the execution is fluid.
From Bidding to Playing
Once the bidding stops, the play begins. There are exactly 13 tricks in a hand. Each player contributes one card to each trick. The highest card of the led suit wins, unless a trump suit is established by the contract. The declarer plays against three defenders. The defenders work together, but they cannot share information. This lack of communication is the puzzle’s sharpest edge.
You track scores carefully. Points for tricks. Points for bonuses. Points for penalties. The scorekeeper’s job is vital. A


The Bidding War That Led to Six Spades
West passes. The deal starts quietly, but that quietness is a lie. West holds the cards, sees the board, and says nothing. It’s a trap set in motion by silence.
Then North speaks up. 1♠. A standard opening. Strong. Confident. East sits there and passes. They have nothing to offer. The pressure shifts entirely to South.
South doesn’t hesitate. 2♠. This isn’t a weak jump. It’s a limit raise. South has the support, the points, and the intent. West passes again. The tension tightens. North looks at the hand, does the mental math, and pushes further. 3♠.
Now South has a choice. A big one. The partnership has enough strength for game, maybe more. South looks at the trump fit. Looks at the side suits. And decides to go for the kill. 6♠.
East passes.
The contract is set. Six spades. North is the declarer. The table holds its breath. Everyone is waiting to see if the partnership has calculated the losers correctly or if they’ve bitten off more than they can chew. The auction ends. The play begins.
“In bridge, a jump to game isn’t just a bid; it’s a promise of precision.”
The question now isn’t about the bidding. It’s about the execution. Can North take twelve tricks? The deal is on.

South is playing to take twelve out of thirteen tricks. That’s an aggressive line. The other three players pass. South bids first.

How the Winning Bidder Claims the Contract
For those who successfully place the highest bid, the game shifts gears. They become the declarer. Their job? To play out a contract of six.
Bridge is essentially a war for dominance. Two sides fight for the right to dictate the trump suit or to play at no-trump. The dealer kicks off the bidding process. Every bid is a specific call: a number from one to seven, paired with a suit.


The lowest bid is 1. Add six to that number, and you have your target. If you bid one heart, you are promising eight tricks with hearts as trumps. It sounds simple enough, but getting there requires a bit of strategy.
You are essentially betting that your side holds more cards in that suit than the opponents do. Win the auction for a suit where your cards outnumber theirs, and you are in a much better position to win the hand.
Every turn offers a choice. Bid or pass. That is the entire menu. There are no other options.
To navigate this, you need the language. Bridge has its own dialect, and if you do not speak it, you are lost at the table. Here is the glossary you actually need to know to survive the auction.
The Core Roles
Auction : This is just the bidding phase. You are arguing over how many tricks will be played.
Contract : The specific number of tricks the declarer must take to fulfill their bid. Miss this, and you pay the price.
Declarer : The player who wins the auction. They are the ones trying to make the contract.
Dummy : The declarer’s partner. Their hand is laid face up on the table for everyone to see. They have no say in the play, just a pair of eyes and a set of cards.
Defensive Calls
Double : A bid to increase the score or penalties. If the contract is made, the opponents get more points. If it is set, you get more. It is a high-risk, high-reward move.
Overcall : A bid made after the opponents have opened the auction. You are interrupting their flow.
Redouble : Doubling a double. This escalates the stakes significantly.
Partner Dynamics
Raise : A bid in a suit your partner has already bid. You are supporting their choice.
Rebid : Your second bid in the auction. You are clarifying your hand.
Response : Your call after your partner opens the bidding. You are telling them what you have.
The State of Play
Rubber : Two games. This is the structure of standard bridge.
Vulnerable : A side that has already won a game in the rubber. Being vulnerable changes the scoring math entirely. Penalties for being set are higher, but bonuses for making contracts are too.
Not vulnerable : A side that has not won a game yet. You are safer from penalties, but the rewards for success are smaller.
Card Distribution Terms
These terms describe the shape of your hand.
Singleton : Just one card of a suit.
Void : No cards in a suit.
Major : Hearts or spades. These are the expensive suits.
Minor : Diamonds or clubs. Cheaper suits.
Ruff : To trump. Using a trump card to win a trick in a different suit.
Set : To defeat the contract. The declarer failed to take the required tricks.
Undertricks : The number of tricks the declaring side falls short. Each undertrick costs points.
Table : Another word for the dummy.
Why do you need to know these terms? Because ambiguity is costly. If you misidentify


Decoding Bridge Bids and Auction Rules
A contract isn’t just a promise. It’s a specific mathematical target. If your side agrees to play clubs as trumps, you aren’t just trying to win a few hands. You are contractually obligated to take at least seven tricks. Miss that mark and you’re down.
The numbers map directly to your goal. A 1 opening? That signals seven tricks with diamonds as trumps. Bump it up to 3 in diamonds and suddenly you’re chasing nine tricks. Go 3 NT and the rules change entirely: nine tricks with no suit designated as trumps. No trump suit means you’re playing pure high-card strength.
The auction doesn’t have to start with a specific card. Any opening bid sets the tone. But once the dealer speaks, the turn rotates. Each player has three main options: pass, bid, or double. Redouble is also on the table in frequent cases.
Here is the hard constraint. Each new bid must be higher than the previous one. You can’t bid down. You can’t stay flat. You have to go up.
But “higher” doesn’t always mean “more tricks.”
You can bid in a higher-ranking suit without increasing the number of tricks required. This is where beginners trip up. They think a higher bid always equals a harder contract. It doesn’t. You might bid a higher suit while staying at the same trick level. The rank of the suit matters just as much as the number.


Spades sit at the absolute top of the hierarchy. They are the undisputed king of the suits. Hearts follow next. Diamonds come in third. Clubs are at the bottom of the standard suit hierarchy.
Notrump is the real wildcard here. It outranks even spades.
Why the Order Matters
Getting the order right isn’t just trivia. It dictates how you bid. If you’re trying to figure out how to remember suit ranking in bridge, there is a trick.
The four standard suits line up alphabetically.
Clubs.
Diamonds.
Hearts.
Spades.
Easy to memorize. No brain power required.
But notrump breaks the pattern. It doesn’t start with a suit name. It sits above spades. High. Dominant.
In bridge, this ranking determines which suit wins a trick when players play different suits. Spades beat hearts. Hearts beat diamonds. Diamonds beat clubs. Notrump beats everything.
The Notrump Exception
You might wonder why notrump is so powerful. It has no trump suit of its own. It relies on high cards. Aces and kings. It’s a test of pure strength.
When notrump is the contract, there are no trumps. The highest card of the suit led wins. Unless someone else plays a higher card in that same suit.
This is which suit ranks highest in bridge. The answer is always notrump. If notrump is not part of the conversation, then spades take the throne.
Practical Application
Knowing this helps you bid smarter. You don’t waste time bidding spades if notrump is on the table and your hand supports it. You don’t bid clubs over spades unless you have a specific reason.
The hierarchy is rigid. It doesn’t change. It’s built into the game’s DNA.
Players who mix this up end up bidding the wrong level. They lose contracts they should have won. They gain contracts they should have passed.
It’s a small detail. But it adds up. Fast.


Deciphering Bridge Bids and Contracts
In contract bridge, the hierarchy of bids is strict. Clubs and diamonds are classified as minor suits. Hearts and spades are major suits. This distinction matters because majors score higher in the final tally.
The bidding continues until someone pushes past those basic levels. At higher numbers, you can bid in any suit or no-trump (NT). This opens up more complex strategies.
The auction stops the moment three consecutive players pass. That silence signals the end. The last bid made stands as the final contract.
Who actually plays the hand? The declarer is the player on the side that won the auction. Specifically, it is the partner who first bid the chosen trump suit during the auction.
Consider a typical scenario. If South opened the bidding and established spades as the trump suit, South becomes the declarer. It’s not about who played the best defense. It’s about who set the direction.
This role defines the rest of the game. The declarer leads the first card. They plan the whole play. The other three players are essentially reacting.
Why does it matter who the declarer is? Because the dummy’s hand gets laid out flat. Only the declarer can see both hands clearly. That gives them a massive informational advantage. The opponents have to guess.
The mechanics are simple. The auction ends. The contract is set. The declarer takes control. Everything else is just execution.

Keep an eye on North. Seriously. Don’t let any other player peek at your cards during the auction. This is where the real strategy lives.
Then there’s the doubling. If an opponent makes the most recent bid, you get a chance to say the magic word: “double.” You just double the stakes. Win your contract? You get double the points. Lose? You lose double. The risk matches the reward.
Either opponent can then redouble. Three consecutive passes end the auction, which means the final contract might be doubled or redoubled. This inflates the score significantly. It’s high stakes.
Bidding confuses beginners. It’s not intuitive at first. But once you start playing, you’ll see that intelligent bidding is the key to winning. You don’t need to memorize every nuance right away. Whole books are written on this stuff. To get you started, here are the basics.
Counting Points and Choosing Suits
First, arrange your hand by suit. Assign points to your cards using a standard system:
- Aces: 4 points
- Kings: 3 points
- Queens: 2 points
- Jacks: 1 point
- Singleton (one card in a suit): 1 point
- Void (no cards in a suit): 2 points
Add them up. Look for your strongest suit. To bid a suit as trump, you generally want 4-5 cards with at least 1-2 high honors. If you have 16-18 points and a fairly even distribution, consider bidding no-trump.
When to Open and Respond
The general rule? Open a bid only if you have 13 or more points. This is your opening move.
Of course, the script changes if your partner has already bid. They are signaling they have enough points to open. Now they’re asking you to support their suit or introduce a new one.
Your response depends on your hand:
– Support their suit with 6-8 points.
– Introduce a new suit with 8-10 points.
If your partner passed, and you don’t have 13 points, you should probably pass too. Don’t force the issue.
Calculating Team Strength
You and your partner need to estimate the total points in your partnership. This determines how high you can bid safely.
- 28+ points : Enough for a bid of 4.
- 33 points : Sufficient for a bid of 6.
- 36 points : Enough for a bid of 7, known as a “grand slam.”
These are the essentials. There are other conventions, but these cover the basics.
Reading the Opponents
Every rule has exceptions. Pay attention to your opponents. They might be bidding a suit that is particularly strong in your hand.
Now you face a choice. Based on your partner’s bids and your own points, do you let their bid go through and try to set them? Or do you try to win the contract yourself and earn the game points? It’s a calculated risk.
Once you understand the auction, you’re ready for the next phase.
Contract Bridge Play
The bidding ends. The play begins.
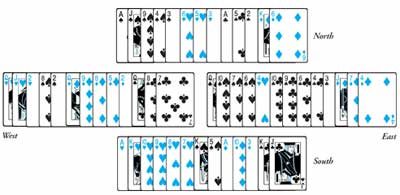
The player to declarer’s left (West in our sample) leads the first card. This is the opening lead.
Once that lead is made, the dummy hand is placed on the table. This is the declarer’s partner’s hand (North). The partner is now functionally out of the round. The declarer controls this hand.
South rearranges the dummy hand to show trumps first.

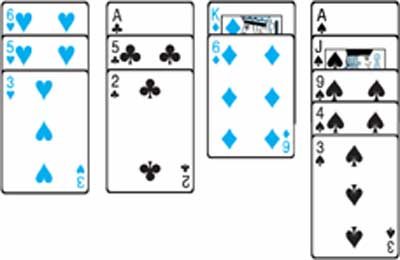

When you’re seated across from your partner, known as dummy, the dynamic shifts. You don’t actually touch the cards. Declarer calls out which card dummy should play, or simply plays it from the dummy’s side themselves. It’s a strange quirk of contract bridge, but one that streamlines the game.
There is a strict hierarchy to playing a trick. Every player must follow suit if they can. If you hold a card of the same suit as the opening lead, you must play it. This rule prevents players from easily abandoning a suit they don’t like. But what if you’re void? Then you’re free to discard. You can throw a card from any other suit, including a trump if you have one.
The Mechanics of Winning a Trick
Winning isn’t just about having the highest card. It’s about context.
If no trumps are played, the highest card in the led suit takes the trick. If a trump is introduced, it beats any card of the original suit, regardless of rank. The highest trump wins.
Whoever wins the trick gets the privilege of leading the next one. They can play any card from their hand. This control is vital for building your own tricks later.
Dummy’s Leading Position
A specific rule applies when the dummy’s hand wins a trick. Since dummy cannot choose their own cards, the declarer plays for them. But who leads next?
If dummy wins, the next card must be led from the board. The declarer still makes the choice, but the source of the lead is fixed. This prevents confusion about whose turn it is to initiate the next sequence.
Breaking Trump
There is a moment in every bridge hand where the trump suit is “broken.” This happens the first time a trump is played by a player who could have followed suit in another way.
Before that break, players generally avoid leading trumps unless they have no other options. It’s a strategic hesitation. You don’t want to give away information or waste a high trump too early. But once the suit is broken, the floodgates open. Anyone can lead a trump if they choose.
A Concrete Example
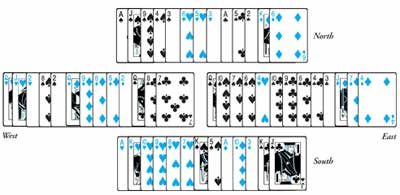
Let’s look at how this plays out with the hands we introduced earlier. The structure of the game becomes clearer when you see it in motion.
West begins by leading the


Why East’s J was the decoy
The play unfolded with a classic trap for the unwary declarer. South started by winning the opening lead with the A. Then, at trick two, he cashed the A. At trick three, the K hit the table.
South thought he had squeezed the defense dry. He expected the honors to drop. Instead, the defense held firm. East had been sitting on a hidden strength. The J remained untouched until it was too late. South didn’t just lose a trick. He lost control of the suit.
The key wasn’t the high cards South held. It was the one card he ignored. East’s J. It was the only card left in the suit that could beat South’s remaining winners. By cashing the top honors early, South revealed too much. He showed his hand. He showed his weakness.
Now South realizes he made a fatal error. He assumed East was void. He assumed the defense had no more guns. But the J was still there. Waiting. Ready to strike.
The lesson in the squeeze
This isn’t just about cards. It’s about reading the room. South looked at the cards in his hand and saw only his own power. He didn’t look at what East was holding. He didn’t consider the possibility that East was saving a trump for a rainy day.
When you cash the A and K, you are essentially asking your opponent, “Do you have anything left?” If they say nothing, you feel safe. But if they say yes, you are in trouble. East said yes. And the J proved it.
What went wrong in the analysis
Let’s break down the sequence again. South wins with the A. Cashes the A. Cashes the K. The defense wins with the J. Simple. Brutal. Effective.
Why did South fail? He didn’t account for the distribution. He didn’t think about the possibility of a singleton or doubleton in East’s hand that included an honor. He assumed symmetry. He assumed logic. But bridge is often illogical. It’s emotional. It’s psychological.
East played the game perfectly. He waited. He watched. He let South commit to the wrong path. And when the moment came, he struck.
The broader implications
This hand is a reminder to never assume you’ve won until the last card is played. It’s a lesson in humility. For South, it was a harsh wake-up call. For East, it was a masterclass in patience.
The J didn’t just win a trick. It won the war. And South? He’s left staring at his cards, wondering where he went wrong. The answer is simple. He stopped looking. He started assuming. And in bridge, assuming is suicide.
So next time you cash your high honors, pause. Look at your opponent. Do they look worried? Do they look relaxed? Because if they look relaxed, you might be walking into a trap. A trap set by a J.


It was a moment of pure, unadulterated deduction. West didn’t just play a card; they discarded their strategy. Specifically, West threw out their Jack and two, leaving the Queen in reserve for later use. It wasn’t a mistake. It was a message. Or perhaps, it was a trap.
South, ever the relentless pursuer of the trick, continued at the fourth trick. They led the three to dummy. The air in the room (virtual or otherwise) thickened. Everyone watched the play. West held the Queen. South held the power of the lead. Dummy held the potential for the win. But would West cash in? Or would they hold up, waiting for the perfect moment to strike?
The beauty of bridge lies in these silent exchanges. A discarded Jack can mean weakness. A retained Queen can mean strength. Or it can mean deception. In this hand, West’s decision to keep the Queen sent a clear signal: I’m not done yet. And South, by leading the three to dummy, acknowledged that signal while simultaneously challenging it.
So, what happens next? Does West take the trick? Does South finesse? Or does the Queen sit there, a silent judge, waiting for the final act? The bridge table is a stage for psychological warfare, and this hand was no exception. West’s play was a masterclass in restraint. South’s response, a calculated risk. And the rest? Well, that’s for the players at the table to decide.
But you? You’re watching. And you’re wondering. What would you have done? Would you have kept the Queen? Would you have led the three? Or would you have thrown a different card entirely, hoping to confuse the opponent? The game continues. And so does the analysis.


When South Leads the Ten, West’s Queen Fails the Test
The position on the table is tight. South is on lead. He plays the three to dummy’s king. West follows suit, showing out or just small cards—it doesn’t matter yet. But the real drama starts on the next card.
South leads the ten.
West, holding the queen, is in a bind. If he covers with the queen, dummy’s remaining trump takes it. If he ducks, South might win the trick with the ten anyway. West decides to cover. He plays the queen.
South doesn’t win with a high card. Instead, he trumps it in dummy.
“West puts on the Q, but South trumps it in dummy with dummy’s remaining trump.”
This is where most players get it wrong. They think covering high cards with higher ones is always safe. Here, it’s a trap. By covering, West forces dummy to use a trump that might be needed later for control. South’s plan? To strip the hand.
But there’s a catch. The text cuts off here: “Except for West’s high…”
What’s missing? Likely, West still holds a high trump or a winner that changes the outcome. If West has the ace of trumps left, he could have won the trumping trick. If he has a high side suit winner, South’s squeeze might fail.
Why Covering With the Queen Was a Mistake
Let’s break down the logic.
- South leads the 3. Dummy wins with the K.
- South leads the 10. West covers with the Q.
- Dummy trumps with a low trump.
If West had ducked, South’s ten might have won the trick. But then South would still have the ten as a winner. By covering, West gave South a free trump entry or forced a trump reduction that benefited declarer.
In bridge, covering an honor with an honor is a golden rule—but only when it’s to your advantage. Here, it helped declarer.
What’s Left in West’s Hand?
The article stops abruptly. “Except for West’s high…”
This implies West still holds a high card that could have changed the play. Perhaps:
- The ace of trumps?
- A high side-suit winner?
- A singleton that allows a ruff?
Without knowing the full hand, we can’t say for sure. But one thing is clear: South’s play was precise. He led low to dummy, then led the ten to force West’s hand. West bit.
The Bigger Lesson
This isn’t just about one trick. It’s about pressure.
Declarer led the ten not to win the trick immediately, but to test West’s judgment. Would West cover? Would he duck?
West covered. And that cost him.
In bridge, every card is a question. The opponent’s answer reveals their hand. South’s ten was a question. West’s queen was the answer. And it was the wrong one.
What If West Had Ducking?
If West had ducked the ten:
- South’s ten might have won.
- South would still have control of the suit.
- West

South takes every trick. The contract holds. Success.
You’ve seen the bidding. You’ve watched the play. Now comes the part that actually matters. Points.
Contract Bridge scoring isn’t just math. It’s psychology. It’s reward. It’s punishment. It takes getting used to.
The Basics of Making Your Contract
After the cards are played, one thing is clear. Did the declarer make the bid? Or did they go down?
If you make the contract, you score based on a strict table. Simple enough. But Bridge isn’t simple.
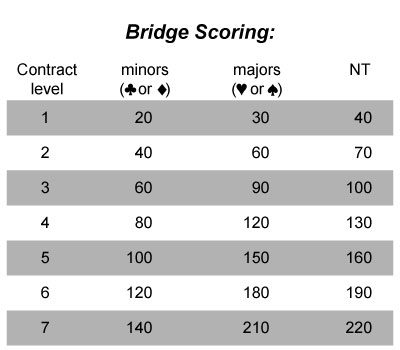
A contract of 6 tricks? That’s a small slam. A contract of 7? That’s a grand slam. Both get bonuses. Huge ones.
But here’s the catch. You have to bid them.
Win six tricks without bidding six? Zero points for the slam. Win seven without bidding seven? Still nothing. The scorebook doesn’t care about luck. It cares about intention.
If you win six or seven tricks but did not bid that number, you are not credited with a slam.
This is where beginners lose money. They play well. They don’t score. Because they didn’t commit.
Why Scoring Matters More Than Winning Tricks
Most new players think winning tricks is the goal. It’s not. Making contracts is the goal.
Tricks are just the vehicle. Contracts are the destination.
If you bid 3NT and take 10 tricks, you score for 3NT. Not for 4NT. Not for the extra trick. Just 3NT. The extra trick? It’s a trick. Nothing more.
If you bid 3NT and take 9 tricks? You go down. You lose points. Even if you played perfectly.
This is why bidding is half the game. Play is the other half. But bidding decides what you’re playing for.
The Slam Bonus: Risk and Reward
Slams are where the big money is. Small slam (6 tricks). Grand slam (7 tricks). Both require courage.
Why? Because if you go down, you lose more than you would have by bidding lower.
A doubled down contract can wipe out your score for the day. A made grand slam can double your opponent’s score.
It’s high stakes. That’s the point.
You don’t bid a grand slam because you’re sure you’ll take all 13 tricks. You bid it because the potential reward outweighs the risk. Even if you’re only 90% sure.
The Table Doesn’t Lie
Bridge scoring is unforgiving. It doesn’t care how close you were. It doesn’t care about honor. It cares about the number in front of you.
Bid 4. Make 4. Score.
Bid 4. Take 5. Score for 4.
Bid 4. Take 3. Lose.
No middle ground. No partial credit.
This is why experienced players double-check their hands before bidding. Not because they’re afraid to lose. But because they know what winning looks like.
And winning, in Bridge, is just a matter of keeping your word.

Understanding Down Scores and Penalty Points
When a bridge contract fails, the consequences are immediate and mathematical. The defending side doesn’t just celebrate; they get points. These are officially known as “below the line” scores.
Here is how the scoring works when a contract goes down.
The Basics of Undertricks
If the declarer cannot make the contract, the defenders score points for each trick the declaring side falls short. These are called undertricks.
The number of points awarded depends on whether the contract was doubled or redoubled. It also depends on whether the declaring side was vulnerable.
The Scoring Chart
The chart below shows exactly how many points the defenders receive per undertrick.
| Contract State | Not Vulnerable | Vulnerable |
|---|---|---|
| Undoubled | 50 points | 100 points |
| Doubled | 100 points | 200 points |
| Redoubled | 200 points | 400 points |
Why This Matters
These points are critical. They can swing the match.
A single undertrick in a doubled contract when vulnerable nets the defenders 200 points. That is a significant chunk of the game. It is enough to change a game contract into a part-score for the defenders.
How to Calculate the Total
To find the total score for the defenders:
- Count the number of undertricks.
- Multiply by the point value based on vulnerability and doubling.
For example. If a contract is doubled and the declarer is vulnerable, each undertrick is worth 200 points. Two undertricks would equal 400 points.
Key Takeaways
- Undertricks are the tricks by which the declaring side fails.
- Not vulnerable contracts award 50 points per undoubled undertrick.
- Vulnerable contracts award 100 points per undoubled undertrick.
- Doubling and redoubling multiply these penalties significantly.
This system ensures that risk is rewarded. Taking a big risk by bidding high and getting doubled and vulnerable can be costly if you fail. But if the defenders fail to defend well, the declarer still has a chance. The math is strict. The points are real.
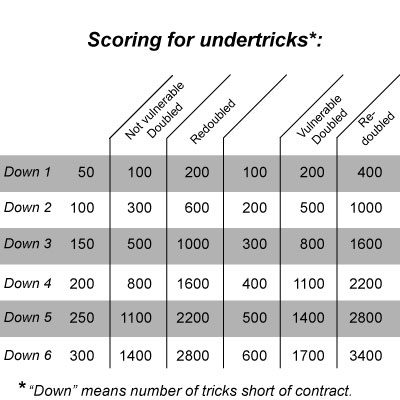

If your contract fails, the opposition doesn’t just get a pat on the back. They score points for undertricks based on the penalty charts. It’s a direct punishment for overreach.
In Rubber Bridge scoring, the ultimate goal isn’t just winning tricks. It’s winning the rubber. You secure that victory by scoring two games. A game is defined as 100 points derived from tricks bid for and successfully made.
It sounds like a slow grind, but it can happen fast.
You can bid and make a game on a single deal. The math is simple. A contract of 3 No Trump scores 100 points. So does a successful 4-level contract in a major suit. One hand. One score. You’re halfway to the rubber win.
“It’s quite possible to bid and make game on a single deal”
This isn’t about accumulating points over hours. It’s about hitting those 100-point milestones. Once you hit two of them, the rubber is yours. The other side? They’re left with undertrick penalties and a loss.


It feels counterintuitive, doesn’t it? You look at a contract for just two tricks above the book and expect modest returns. But the math in contract bridge has a quirky twist. If your final contract lands at the one-level or two-level, and you make at least three overtricks, the score jumps. Specifically, making three overtricks on a one-level bid or two overtricks on a two-level bid adds enough points to push your total over the 100-point threshold.
This brings us to the concept of part-scores. These are contracts that don’t reach the 100-point mark required for a game but still yield a solid number. You don’t always need a slam or a high-level game to win big. Sometimes, you build your points through a series of deals. You might bid and make 2NT, then follow it up with a successful 2♣. Neither contract is a game in itself. Each is a partial score.
The beauty of this system is cumulative. You stack these smaller wins. A player who consistently makes part-scores often outperforms someone who chases big games and fails. It’s about volume and accuracy over occasional glory.
So, when you’re evaluating whether to bid a three-level contract or settle for a two-level part-score, consider the point potential. A made 2♠ with one overtrick gives you 110 points if non-vulnerable. That’s close to the game threshold. If you can string several of these together, you build a lead that’s hard to break.
Is there a better way to win? Maybe. But the part-score strategy is a reliable engine for points. It rewards precision. It punishes overreaching. And it keeps you in the game when the big bids fall apart.
“A series of part-scores often beats a single failed game bid.”
The key is recognizing the value of the smaller contracts. Don’t dismiss them as insignificant. They are the foundation of a sustainable scoring strategy. You bid low. You make your tricks. You collect the points. Repeat.


You bid one. You make two. That’s 60 points. On the flip side, maybe you bid one but only make it for 40. Add them together and you hit the 100-point threshold. That is enough for game. Simple math.
But here is where the tension starts.
Once a side scores one game, they become vulnerable. If both sides have scored a game previously, both are vulnerable. If neither has, neither is vulnerable. It’s a binary state. You are either vulnerable or you are not.
Extra tricks made at any contract do not count toward game.
This distinction matters because being vulnerable changes the risk. When defenders set a contract, they earn more points if the declarer is vulnerable. The stakes are higher. The score for the winning side also increases if the final contract is doubled or redoubled.
The Mechanics of Keeping Score
Most players keep score on both sides. You use a preprinted Bridge score pad or just draw lines in a cross on a whiteboard. It’s old school. It’s tactile.
Scoring happens in two distinct zones: above and below the line.
Points for making the contract go below the line. Points for overtricks, bonuses, and penalties go above. This separation is intentional. It tracks progress toward the next game.
If you double the contract, the potential upside explodes. But so does the risk. A defeated doubled contract above the line can swing the match. It’s not just about making your bid. It’s about how much you stand to lose if you fail.
Some players prefer digital trackers. They remove the handwriting clutter. But the underlying logic remains the same. Below the line tracks games. Above the line tracks bonus points and penalties.
The vulnerability status dictates the penalty multipliers. It is not optional. It is built into the rules. You cannot opt out of being vulnerable once you hit 100 points below the line.
Does this mean you should always play aggressively? Maybe. Or maybe you play conservatively until the other side shows weakness. The scoring structure encourages both strategies depending on the state of the board.
There is no perfect strategy. Just points. And the next hand.
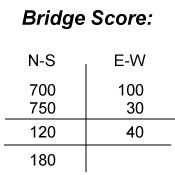

The scoring system in contract bridge relies on a single visual separator. A horizontal line divides the scoring area into two distinct zones. Everything below that line counts toward making game. Everything above it counts for bonuses, overtricks, and penalties. It is a hard split. You do not mix them.
Consider a standard hand. East-West bid one no-trump and made two no-trump. They scored forty points below the line. This is the contract value. They also scored thirty points above the line. This was for the overtrick. The separation is strict.
Then North-South bid four.

Scoring The Win and The Reset
A single line under the score meant one thing: the game was over.
They hit 120. That’s enough to close out the game in standard contract bridge. Once that line was drawn, the scoreboard cleared.
Think of it this way. East-West had banked their 40-point part-score. Those points counted. They moved to the side. But the main tally? Gone. Reset.
Both sides started fresh. No carry-over. No lingering debt. Just pure trick points.
They needed 100 to win again. Clean slate.
North-South didn’t hesitate. They jumped straight to 3.


The Cost of a Mistake at the Bridge Table
One slip. That’s all it took for the East-West pair to hemorrhage points. They went down on a vulnerable contract, handing their opponents a tidy 100 points above the line. A small price to pay, perhaps, in the grand scheme of a tournament, but painful in the moment.
Then came the North-South hand.
This wasn’t just a bid. It was a statement. They didn’t just make their contract; they ran away with it. The result was a masterclass in rubber bridge scoring, a chaotic dance of numbers that would confuse anyone who hasn’t lived and breathed the suit.
First, there was the trick score. They scored 180 below the line. This is the meat of the deal—the actual tricks taken. But the real money—the real value—was piling up above the line. Because they were vulnerable, they snagged a 750 point bonus for the small slam. That’s the reward for taking 12 tricks in a contract of six.
But the kicker? The finish.
North-South had already won one game. This contract sealed the rubber. They didn’t just win the hand; they won the match two games to none. In rubber bridge, closing out a rubber without the opponents scoring a game triggers a massive penalty. It’s called the rubber bonus. Here, it landed them an extra 700 points above the line.
Let that sink in. A single hand, won cleanly, netted them:
* 180 (tricks)
* 750 (slam bonus)
* 700 (rubber bonus)
Total: 1,750 points for North-South.
Meanwhile, East-West sat there with 170. The swing wasn’t just a win; it was a dismantling.
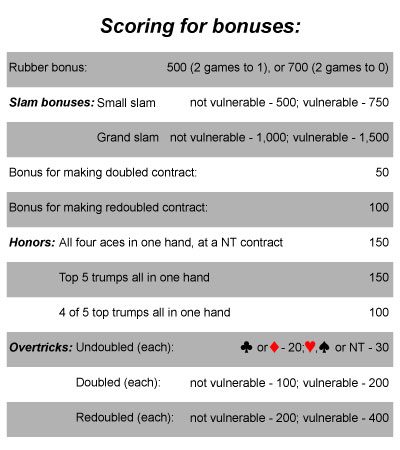
This is why you memorize the bonus table. You don’t just play for tricks. You play for the bonuses that turn a good hand into a career-defining score.
Below is a breakdown of how those bonuses and overtricks stack up, so you can see exactly where the points come from when the bids get high.

You thought you had the basics down? Good. Because now we are diving into the variations that don’t get nearly enough love.
Remember the tip about memorizing cards? It’s not just for Contract Bridge. It’s for every single hand you play. Notice when someone fails to follow suit. That’s your first clue. It’s also about getting comfortable with the number 13. It’s the cards per suit. The cards per player. The tricks per hand. It’s the rhythm of the game.
More books exist on Bridge than any other card game. Seriously. So go to a library. Go to a bookstore. Look at the bidding styles. Look at the card-play tips.
Contract Bridge is complex. It has layers. But it’s also a game you can play until you’re too old to shuffle. On the next page, we introduce the weirdos. The alternatives. The variations.
Auction, Honeymoon, Reverse and Three-Handed Bridge
You know how to play Contract Bridge. It’s the most popular version. The big leagues. But there are other ways to play. Ways that might feel more chaotic. Or more strategic. Or just different.
Let’s look at Auction Bridge. Honeymoon Bridge. Reverse Bridge. And Three-Handed Bridge.
Auction Bridge
Auction Bridge had its heyday. Roughly 1900 to 1930. Before Contract Bridge took over the throne. It’s the old guard. The grandfather of modern play.
Number of players: Four.
The object is simple. Score points. But here’s the catch. If you take enough tricks, you score game and slam bonuses. You don’t care how high the bidding ended. You just care that you took the tricks.
The cards: Standard 52-card deck. No jokers. No extras.
To play: The auction. The procedure. The rules of play. They are already described in the Contract Bridge section. You’ve read it. You know it. Only the scoring changes in Auction Bridge.
Scoring: It underwent several changes. We are looking at the final version. A rubber ends when one side scores two games. Game is 30 points in trick-score.
It’s binary. Two games. That’s it. Once you hit that threshold, the rubber is over. The score is tallied. The next rubber begins.
It’s faster. It’s harsher. It doesn’t let you hide behind a high bid if you can’t deliver.
If you’re looking to understand how the game evolved, this is where you start. It’s raw. It’s direct. It’s less about the contract and more about the result.
“In Auction Bridge, if you take enough tricks, you score game and slam bonuses without regard to how high the bidding ended.”
This is the key difference. Contract Bridge punishes you for overbidding. Auction Bridge ignores your promise. It only looks at the outcome.
It’s a different philosophy. One is about risk management. The other is about pure execution.
Which one do you prefer? The safety of the contract or the chaos of the open auction?
There’s no wrong answer. Just different games. And plenty of books to help you master them.


The scoring math in Auction Bridge is unforgiving. You’re looking at 6, 7, 8, 9, and 10 points per trick for NT, all scored below the line. Hit 30 points and you reset the board. Win two games to close out a rubber, and you snag a 250-point bonus. It’s not just about winning tricks. It’s about volume.
Small slam bonuses? 50 points for taking 12 of 13 tricks. Grand slam? 100 points for sweeping all 13. Double or redouble those contracts and the trick score doubles or quadruples. Miss your mark? You bleed points. 50 per trick if undoubled. 100 if doubled. 200 if redoubled.
Honors change the game too.
“Bonuses are given to hands that contain any of the following: 3 of top 5 honors… or 3 aces at NT… 30 points.”
It’s a chaotic system. You get 30 points for three of the top five honors (Ace, King, Queen, Jack, Ten of trump) or three aces at NT. Forty points for four honors or four aces at NT. Fifty if the five trump honors are split. Eighty if you hold four trump honors in one hand. Ninety if your partner holds that fifth trump. One hundred points for four aces at NT. One hundred for five honors in one hand.
The bidding in Auction lacks the sophistication of modern Contract Bridge. The goal is low-level contracts. You might miss the best suit for your side. But you keep playing for tricks. The possibility of a game or slam is always there.
Honeymoon Bridge: Intimacy Meets Strategy
This is one of the most popular two-player Bridge variants. It’s designed for couples. Or honeymooners. Players sit next to each other. Not opposite. Dealer deals four hands. Each player gets their own hand plus a dummy hand for their partner.
The deal is specific. Two rows of three cards face down. One card face up on top of each face-down card. The last card goes face up next to the rows.
Bidding follows normal Bridge rules. A single pass ends the auction. Play is where it gets weird. Each player controls the cards played from the partner/dummy hand across the table. The player at the declarer’s left makes the opening lead.
You select cards only from the exposed cards in your dummy hands. Trick finishes. Turn up any uncovered card in your dummy. That newly revealed card becomes available to play. It’s a game of constant revelation.
Reverse Bridge: The Upside-Down Game
This four-handed game turns every rule upside-down. The object is entirely opposite. You try to force opponents to take the tricks for the bid you make.
If your side wins a final contract of 4, you want them to take the tricks. The rules and play remain identical to regular Bridge. The intent is inverted.


The goal here isn’t just to win. It’s to dominate. You need your opponents to take at least 10 of 13 tricks with spades as trumps. Why? Because you get the score for any contract you force them into. It’s a psychological game wrapped in a card game.
The strategy flips standard bridge logic on its head. In regular bridge, you hoard high cards to win big later. Here, you play the highest card you think will still lose. It feels counterintuitive. It feels risky. But it works. When your side finally snatches a trick, pile the high cards from both hands onto it. Save your low cards. Let them carry the burden later in the hand.
Three-Handed Bridge Strategies
Waiting for a fourth player to materialize is painful. Most people just want to play. So, they invented workarounds. None are perfect. But this method lets three people sit down and have a blast.
You deal four hands. The fourth hand stays on the table, acting as a dummy. Four cards face up. The rest stay hidden. The three players bid to become the declarer. The winner sits opposite the table dummy. The other two defend.
The dealer starts the bidding. Two passes end it. If necessary, players shift seats so the declarer faces the dummy correctly.
Once the opening lead happens, flip the face-down dummy cards. Now the declarer sees the full picture. Then they plan their line of play.
Scoring in Variations
The scoring rules mirror Contract Bridge. Keep it simple. But tracking scores with three people gets messy.
You might have a contract doubled. And redoubled. That only applies to the two players involved in the contract. The third player? They just score for an undoubled contract. It’s a slight asymmetry you have to live with.
Bridge Game FAQ
How many players are there in bridge?
Four. Playing as two pairs. Partners face each other. Tradition calls them North-South and East-West.
How do you win bridge?
Each partnership scores points by bidding. Or by defeating the opponent’s bid. The partnership with the most points at the end wins.
How do I play bridge online with friends?
Download Fun Bridge on smart devices. It’s the easiest way to connect.
You’ve learned two variations on four-handed bridge. You’ve tackled two-player and three-player versions. No limits on developing skills. You’ll be an impressive player before you know it.
The table is set. The cards are dealt. What’s your next move?